> ## Documentation Index
> Fetch the complete documentation index at: https://dify-6c0370d8-release-1-15-0.mintlify.site/llms.txt
> Use this file to discover all available pages before exploring further.
# Data Source Plugin
> Build a Dify 1.9.0+ data source plugin that feeds documents into the knowledge pipeline
Data source plugins, introduced in Dify 1.9.0, supply documents to a knowledge pipeline and serve as the starting point for the entire pipeline.
This guide covers the plugin architecture, code examples, and debugging methods you need to build and launch a data source plugin.
## Prerequisites
You should have a basic understanding of the knowledge pipeline and plugin development:
* [Step 2: Knowledge Pipeline Orchestration](/en/cloud/use-dify/knowledge/knowledge-pipeline/knowledge-pipeline-orchestration)
* [Dify Plugin Development: Hello World Guide](/en/develop-plugin/dev-guides-and-walkthroughs/tool-plugin)
## Data Source Plugin Types
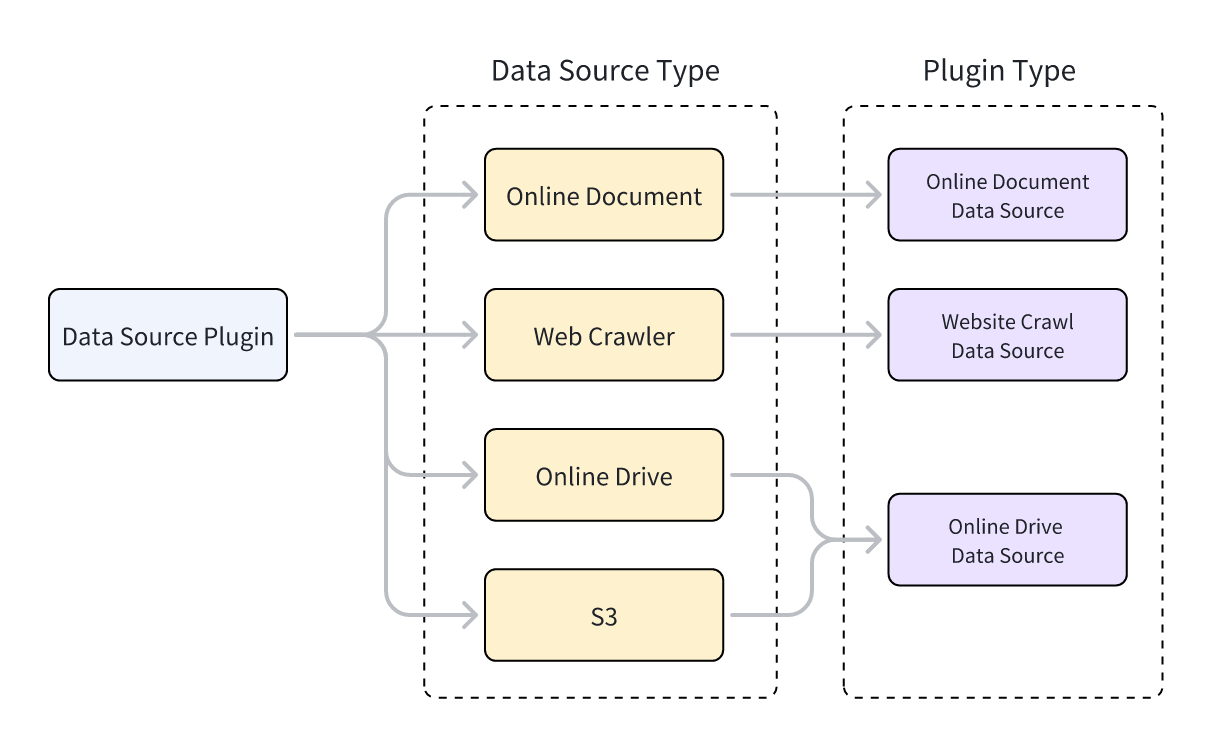
Dify supports three types of data source plugins: web crawler, online document, and online drive. Each type corresponds to a different parent class, and the class that implements your plugin's functionality must inherit from it.
To learn how to inherit from a parent class to implement plugin functionality, see [Tool Plugin: Write the Tool Code](/en/develop-plugin/dev-guides-and-walkthroughs/tool-plugin#4-write-the-tool-code).
Each data source plugin type supports multiple data sources. For example:
* **Web Crawler**: Jina Reader, FireCrawl
* **Online Document**: Notion, Confluence, GitHub
* **Online Drive**: OneDrive, Google Drive, Box, AWS S3, Tencent COS
The relationship between data source types and data source plugin types is illustrated below.
 ## Develop a Data Source Plugin
### Create a Data Source Plugin
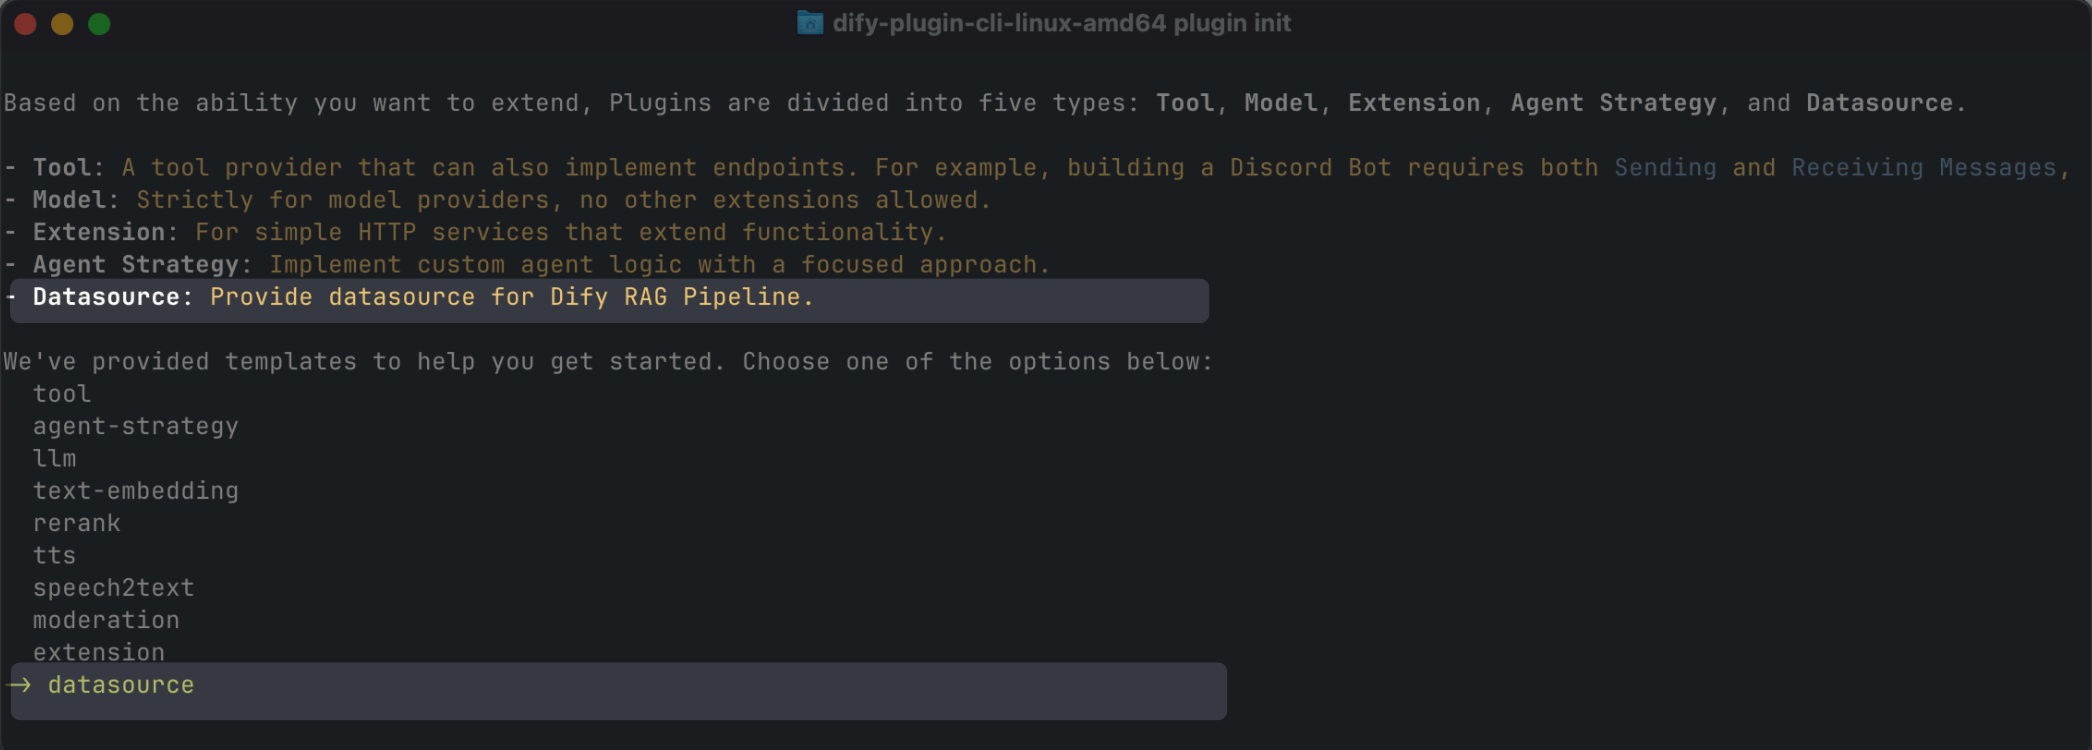
Create a data source plugin with the scaffolding command-line tool by selecting the `datasource` type. After you complete the setup, the tool generates the plugin project code.
```bash theme={null}
dify plugin init
```
## Develop a Data Source Plugin
### Create a Data Source Plugin
Create a data source plugin with the scaffolding command-line tool by selecting the `datasource` type. After you complete the setup, the tool generates the plugin project code.
```bash theme={null}
dify plugin init
```
 Typically, a data source plugin does not need to use other features of the Dify platform, so no additional permissions are required.
#### Data Source Plugin Structure
A data source plugin consists of three main components:
* The `manifest.yaml` file: Describes the basic information about the plugin.
* The `provider` directory: Contains the plugin provider's description and authentication implementation code.
* The `datasources` directory: Contains the description and core logic for fetching data from the data source.
```text theme={null}
├── _assets
│ └── icon.svg
├── datasources
│ ├── your_datasource.py
│ └── your_datasource.yaml
├── main.py
├── manifest.yaml
├── PRIVACY.md
├── provider
│ ├── your_datasource.py
│ └── your_datasource.yaml
├── README.md
└── requirements.txt
```
#### Set the Correct Version and Tag
* In the `manifest.yaml` file, set the minimum supported Dify version:
```yaml theme={null}
minimum_dify_version: 1.9.0
```
* In the same file, add the following tag so the plugin appears under the data source category in the Dify Marketplace:
```yaml theme={null}
tags:
- rag
```
* In the `requirements.txt` file, set the plugin SDK version:
```text theme={null}
dify-plugin>=0.5.0,<0.6.0
```
### Add the Data Source Provider
#### Create the Provider YAML File
The content of a provider YAML file is essentially the same as that for tool plugins, with only the following two differences:
```yaml theme={null}
# Specify the provider type for the data source plugin: online_drive, online_document, or website_crawl
provider_type: online_drive # online_document, website_crawl
# Specify data sources
datasources:
- datasources/PluginName.yaml
```
For more about creating a provider YAML file, see [Tool Plugin: Add Third-Party Service Credentials](/en/develop-plugin/dev-guides-and-walkthroughs/tool-plugin#2-add-third-party-service-credentials).
Data source plugins support authentication via OAuth 2.0 or API Key.
To configure OAuth, see [Add OAuth Support to Your Tool Plugin](/en/develop-plugin/dev-guides-and-walkthroughs/tool-oauth).
#### Create the Provider Code File
* With API Key authentication, the provider code file is identical to that of a tool plugin. You only need to change the provider class's parent class to `DatasourceProvider`.
```python theme={null}
class YourDatasourceProvider(DatasourceProvider):
def _validate_credentials(self, credentials: Mapping[str, Any]) -> None:
try:
"""
IMPLEMENT YOUR VALIDATION HERE
"""
except Exception as e:
raise ToolProviderCredentialValidationError(str(e))
```
* With OAuth authentication, data source plugins differ slightly from tool plugins: when obtaining access via OAuth, they can also return the username and avatar to display on the frontend. `_oauth_get_credentials` and `_oauth_refresh_credentials` must therefore return a `DatasourceOAuthCredentials` object containing `name`, `avatar_url`, `expires_at`, and `credentials`.
The `DatasourceOAuthCredentials` class is defined as follows:
```python theme={null}
class DatasourceOAuthCredentials(BaseModel):
name: str | None = Field(None, description="The name of the OAuth credential")
avatar_url: str | None = Field(None, description="The avatar url of the OAuth")
credentials: Mapping[str, Any] = Field(..., description="The credentials of the OAuth")
expires_at: int | None = Field(
default=-1,
description="""The expiration timestamp (in seconds since Unix epoch, UTC) of the credentials.
Set to -1 or None if the credentials do not expire.""",
)
```
The function signatures for `_oauth_get_authorization_url`, `_oauth_get_credentials`, and `_oauth_refresh_credentials` are as follows:
```python theme={null}
def _oauth_get_authorization_url(self, redirect_uri: str, system_credentials: Mapping[str, Any]) -> str:
"""
Generate the authorization URL for {{ .PluginName }} OAuth.
"""
try:
"""
IMPLEMENT YOUR AUTHORIZATION URL GENERATION HERE
"""
except Exception as e:
raise DatasourceOAuthError(str(e))
return ""
```
```python theme={null}
def _oauth_get_credentials(
self, redirect_uri: str, system_credentials: Mapping[str, Any], request: Request
) -> DatasourceOAuthCredentials:
"""
Exchange code for access_token.
"""
try:
"""
IMPLEMENT YOUR CREDENTIALS EXCHANGE HERE
"""
except Exception as e:
raise DatasourceOAuthError(str(e))
return DatasourceOAuthCredentials(
name="",
avatar_url="",
expires_at=-1,
credentials={},
)
```
```python theme={null}
def _oauth_refresh_credentials(
self, redirect_uri: str, system_credentials: Mapping[str, Any], credentials: Mapping[str, Any]
) -> DatasourceOAuthCredentials:
"""
Refresh the credentials
"""
return DatasourceOAuthCredentials(
name="",
avatar_url="",
expires_at=-1,
credentials={},
)
```
### Add the Data Source
The YAML file format and data source code format vary across the three types of data sources.
#### Web Crawler
In the provider YAML file for a web crawler data source plugin, `output_schema` must always return four parameters: `source_url`, `content`, `title`, and `description`.
```yaml theme={null}
output_schema:
type: object
properties:
source_url:
type: string
description: the source url of the website
content:
type: string
description: the content from the website
title:
type: string
description: the title of the website
"description":
type: string
description: the description of the website
```
In the main logic code for a web crawler plugin, the class must inherit from `WebsiteCrawlDatasource` and implement the `_get_website_crawl` method, using the `create_crawl_message` method to return the crawl results.
To crawl multiple web pages and return them in batches, set `WebSiteInfo.status` to `processing` and call `create_crawl_message` for each batch of crawled pages. After all pages have been crawled, set `WebSiteInfo.status` to `completed`.
```python theme={null}
class YourDataSource(WebsiteCrawlDatasource):
def _get_website_crawl(
self, datasource_parameters: dict[str, Any]
) -> Generator[ToolInvokeMessage, None, None]:
crawl_res = WebSiteInfo(web_info_list=[], status="", total=0, completed=0)
crawl_res.status = "processing"
yield self.create_crawl_message(crawl_res)
### your crawl logic
...
crawl_res.status = "completed"
crawl_res.web_info_list = [
WebSiteInfoDetail(
title="",
source_url="",
description="",
content="",
)
]
crawl_res.total = 1
crawl_res.completed = 1
yield self.create_crawl_message(crawl_res)
```
#### Online Document
The return value for an online document data source plugin must include at least a `content` field to represent the document's content. For example:
```yaml theme={null}
output_schema:
type: object
properties:
workspace_id:
type: string
description: workspace id
page_id:
type: string
description: page id
content:
type: string
description: page content
```
In the main logic code for an online document plugin, the class must inherit from `OnlineDocumentDatasource` and implement two methods: `_get_pages` and `_get_content`.
When a user runs the plugin, it first calls the `_get_pages` method to retrieve a list of documents. After the user selects a document from the list, it then calls the `_get_content` method to fetch the document's content.
```python theme={null}
def _get_pages(self, datasource_parameters: dict[str, Any]) -> DatasourceGetPagesResponse:
# your get pages logic
response = requests.get(url, headers=headers, params=params, timeout=30)
pages = []
for item in response.json().get("results", []):
page = OnlineDocumentPage(
page_name=item.get("title", ""),
page_id=item.get("id", ""),
type="page",
last_edited_time=item.get("version", {}).get("createdAt", ""),
parent_id=item.get("parentId", ""),
page_icon=None,
)
pages.append(page)
online_document_info = OnlineDocumentInfo(
workspace_name=workspace_name,
workspace_icon=workspace_icon,
workspace_id=workspace_id,
pages=[page],
total=pages.length(),
)
return DatasourceGetPagesResponse(result=[online_document_info])
```
```python theme={null}
def _get_content(self, page: GetOnlineDocumentPageContentRequest) -> Generator[DatasourceMessage, None, None]:
# your fetch content logic, example
response = requests.get(url, headers=headers, params=params, timeout=30)
...
yield self.create_variable_message("content", "")
yield self.create_variable_message("page_id", "")
yield self.create_variable_message("workspace_id", "")
```
#### Online Drive
An online drive data source plugin returns a file, so it must adhere to the following specification:
```yaml theme={null}
output_schema:
type: object
properties:
file:
$ref: "https://dify.ai/schemas/v1/file.json"
```
In the main logic code for an online drive plugin, the class must inherit from `OnlineDriveDatasource` and implement two methods: `_browse_files` and `_download_file`.
When a user runs the plugin, it first calls `_browse_files` to get a file list. At this point, `prefix` is empty, indicating a request for the root directory's file list. The list contains both folder and file entries. If the user opens a folder, `_browse_files` is called again, and the `prefix` in `OnlineDriveBrowseFilesRequest` is the folder ID used to retrieve the file list within that folder.
After a user selects a file, the plugin uses the `_download_file` method and the file ID to get the file's content. You can use the `_get_mime_type_from_filename` method to get the file's MIME type, allowing the pipeline to handle different file types appropriately.
When the file list contains multiple files, you can set `OnlineDriveFileBucket.is_truncated` to `True` and `OnlineDriveFileBucket.next_page_parameters` to the parameters needed to fetch the next page, such as the next page's request ID or URL, depending on the service provider.
```python theme={null}
def _browse_files(
self, request: OnlineDriveBrowseFilesRequest
) -> OnlineDriveBrowseFilesResponse:
credentials = self.runtime.credentials
bucket_name = request.bucket
prefix = request.prefix or "" # Allow empty prefix for root folder; When you browse the folder, the prefix is the folder id
max_keys = request.max_keys or 10
next_page_parameters = request.next_page_parameters or {}
files = []
files.append(OnlineDriveFile(
id="",
name="",
size=0,
type="folder" # or "file"
))
return OnlineDriveBrowseFilesResponse(result=[
OnlineDriveFileBucket(
bucket="",
files=files,
is_truncated=False,
next_page_parameters={}
)
])
```
```python theme={null}
def _download_file(self, request: OnlineDriveDownloadFileRequest) -> Generator[DatasourceMessage, None, None]:
credentials = self.runtime.credentials
file_id = request.id
file_content = bytes()
file_name = ""
mime_type = self._get_mime_type_from_filename(file_name)
yield self.create_blob_message(file_content, meta={
"file_name": file_name,
"mime_type": mime_type
})
def _get_mime_type_from_filename(self, filename: str) -> str:
"""Determine MIME type from file extension."""
import mimetypes
mime_type, _ = mimetypes.guess_type(filename)
return mime_type or "application/octet-stream"
```
For storage services like AWS S3, the `prefix`, `bucket`, and `id` variables have special uses and can be applied flexibly as needed during development:
* `prefix`: Represents the file path prefix. For example, `prefix=container1/folder1/` retrieves the files or file list from the `folder1` folder in the `container1` bucket.
* `bucket`: Represents the file bucket. For example, `bucket=container1` retrieves the files or file list in the `container1` bucket. This field can be left blank for non-standard S3 protocol drives.
* `id`: Since the `_download_file` method does not use the `prefix` variable, the full file path must be included in the `id`. For example, `id=container1/folder1/file1.txt` indicates retrieving the `file1.txt` file from the `folder1` folder in the `container1` bucket.
For reference implementations, see the [official Google Drive plugin](https://github.com/langgenius/dify-official-plugins/blob/main/datasources/google_cloud_storage/datasources/google_cloud_storage.py) and the [official AWS S3 plugin](https://github.com/langgenius/dify-official-plugins/blob/main/datasources/aws_s3_storage/datasources/aws_s3_storage.py).
## Debug the Plugin
Data source plugins support two debugging methods: remote debugging and installing the plugin locally. Note the following:
* If the plugin uses OAuth authentication, the `redirect_uri` for remote debugging differs from that of a local plugin. Update the relevant configuration in your service provider's OAuth App accordingly.
* While data source plugins support single-step debugging, we still recommend testing them in a complete knowledge pipeline to ensure full functionality.
## Final Checks
Before packaging and publishing, make sure you've completed all of the following:
* Set the minimum supported Dify version to `1.9.0`.
* Set the SDK version to `dify-plugin>=0.5.0,<0.6.0`.
* Write the `README.md` and `PRIVACY.md` files.
* Include only English content in the code files.
* Replace the default icon with the data source provider's logo.
## Package and Publish
In the plugin directory, run the following command to generate a `.difypkg` plugin package:
```bash theme={null}
dify plugin package . -o your_datasource.difypkg
```
Next, you can:
* Import and use the plugin in your Dify environment.
* Publish the plugin to Dify Marketplace by submitting a pull request.
For the plugin publishing process, see [Publishing Plugins](/en/develop-plugin/publishing/marketplace-listing/release-overview).
Typically, a data source plugin does not need to use other features of the Dify platform, so no additional permissions are required.
#### Data Source Plugin Structure
A data source plugin consists of three main components:
* The `manifest.yaml` file: Describes the basic information about the plugin.
* The `provider` directory: Contains the plugin provider's description and authentication implementation code.
* The `datasources` directory: Contains the description and core logic for fetching data from the data source.
```text theme={null}
├── _assets
│ └── icon.svg
├── datasources
│ ├── your_datasource.py
│ └── your_datasource.yaml
├── main.py
├── manifest.yaml
├── PRIVACY.md
├── provider
│ ├── your_datasource.py
│ └── your_datasource.yaml
├── README.md
└── requirements.txt
```
#### Set the Correct Version and Tag
* In the `manifest.yaml` file, set the minimum supported Dify version:
```yaml theme={null}
minimum_dify_version: 1.9.0
```
* In the same file, add the following tag so the plugin appears under the data source category in the Dify Marketplace:
```yaml theme={null}
tags:
- rag
```
* In the `requirements.txt` file, set the plugin SDK version:
```text theme={null}
dify-plugin>=0.5.0,<0.6.0
```
### Add the Data Source Provider
#### Create the Provider YAML File
The content of a provider YAML file is essentially the same as that for tool plugins, with only the following two differences:
```yaml theme={null}
# Specify the provider type for the data source plugin: online_drive, online_document, or website_crawl
provider_type: online_drive # online_document, website_crawl
# Specify data sources
datasources:
- datasources/PluginName.yaml
```
For more about creating a provider YAML file, see [Tool Plugin: Add Third-Party Service Credentials](/en/develop-plugin/dev-guides-and-walkthroughs/tool-plugin#2-add-third-party-service-credentials).
Data source plugins support authentication via OAuth 2.0 or API Key.
To configure OAuth, see [Add OAuth Support to Your Tool Plugin](/en/develop-plugin/dev-guides-and-walkthroughs/tool-oauth).
#### Create the Provider Code File
* With API Key authentication, the provider code file is identical to that of a tool plugin. You only need to change the provider class's parent class to `DatasourceProvider`.
```python theme={null}
class YourDatasourceProvider(DatasourceProvider):
def _validate_credentials(self, credentials: Mapping[str, Any]) -> None:
try:
"""
IMPLEMENT YOUR VALIDATION HERE
"""
except Exception as e:
raise ToolProviderCredentialValidationError(str(e))
```
* With OAuth authentication, data source plugins differ slightly from tool plugins: when obtaining access via OAuth, they can also return the username and avatar to display on the frontend. `_oauth_get_credentials` and `_oauth_refresh_credentials` must therefore return a `DatasourceOAuthCredentials` object containing `name`, `avatar_url`, `expires_at`, and `credentials`.
The `DatasourceOAuthCredentials` class is defined as follows:
```python theme={null}
class DatasourceOAuthCredentials(BaseModel):
name: str | None = Field(None, description="The name of the OAuth credential")
avatar_url: str | None = Field(None, description="The avatar url of the OAuth")
credentials: Mapping[str, Any] = Field(..., description="The credentials of the OAuth")
expires_at: int | None = Field(
default=-1,
description="""The expiration timestamp (in seconds since Unix epoch, UTC) of the credentials.
Set to -1 or None if the credentials do not expire.""",
)
```
The function signatures for `_oauth_get_authorization_url`, `_oauth_get_credentials`, and `_oauth_refresh_credentials` are as follows:
```python theme={null}
def _oauth_get_authorization_url(self, redirect_uri: str, system_credentials: Mapping[str, Any]) -> str:
"""
Generate the authorization URL for {{ .PluginName }} OAuth.
"""
try:
"""
IMPLEMENT YOUR AUTHORIZATION URL GENERATION HERE
"""
except Exception as e:
raise DatasourceOAuthError(str(e))
return ""
```
```python theme={null}
def _oauth_get_credentials(
self, redirect_uri: str, system_credentials: Mapping[str, Any], request: Request
) -> DatasourceOAuthCredentials:
"""
Exchange code for access_token.
"""
try:
"""
IMPLEMENT YOUR CREDENTIALS EXCHANGE HERE
"""
except Exception as e:
raise DatasourceOAuthError(str(e))
return DatasourceOAuthCredentials(
name="",
avatar_url="",
expires_at=-1,
credentials={},
)
```
```python theme={null}
def _oauth_refresh_credentials(
self, redirect_uri: str, system_credentials: Mapping[str, Any], credentials: Mapping[str, Any]
) -> DatasourceOAuthCredentials:
"""
Refresh the credentials
"""
return DatasourceOAuthCredentials(
name="",
avatar_url="",
expires_at=-1,
credentials={},
)
```
### Add the Data Source
The YAML file format and data source code format vary across the three types of data sources.
#### Web Crawler
In the provider YAML file for a web crawler data source plugin, `output_schema` must always return four parameters: `source_url`, `content`, `title`, and `description`.
```yaml theme={null}
output_schema:
type: object
properties:
source_url:
type: string
description: the source url of the website
content:
type: string
description: the content from the website
title:
type: string
description: the title of the website
"description":
type: string
description: the description of the website
```
In the main logic code for a web crawler plugin, the class must inherit from `WebsiteCrawlDatasource` and implement the `_get_website_crawl` method, using the `create_crawl_message` method to return the crawl results.
To crawl multiple web pages and return them in batches, set `WebSiteInfo.status` to `processing` and call `create_crawl_message` for each batch of crawled pages. After all pages have been crawled, set `WebSiteInfo.status` to `completed`.
```python theme={null}
class YourDataSource(WebsiteCrawlDatasource):
def _get_website_crawl(
self, datasource_parameters: dict[str, Any]
) -> Generator[ToolInvokeMessage, None, None]:
crawl_res = WebSiteInfo(web_info_list=[], status="", total=0, completed=0)
crawl_res.status = "processing"
yield self.create_crawl_message(crawl_res)
### your crawl logic
...
crawl_res.status = "completed"
crawl_res.web_info_list = [
WebSiteInfoDetail(
title="",
source_url="",
description="",
content="",
)
]
crawl_res.total = 1
crawl_res.completed = 1
yield self.create_crawl_message(crawl_res)
```
#### Online Document
The return value for an online document data source plugin must include at least a `content` field to represent the document's content. For example:
```yaml theme={null}
output_schema:
type: object
properties:
workspace_id:
type: string
description: workspace id
page_id:
type: string
description: page id
content:
type: string
description: page content
```
In the main logic code for an online document plugin, the class must inherit from `OnlineDocumentDatasource` and implement two methods: `_get_pages` and `_get_content`.
When a user runs the plugin, it first calls the `_get_pages` method to retrieve a list of documents. After the user selects a document from the list, it then calls the `_get_content` method to fetch the document's content.
```python theme={null}
def _get_pages(self, datasource_parameters: dict[str, Any]) -> DatasourceGetPagesResponse:
# your get pages logic
response = requests.get(url, headers=headers, params=params, timeout=30)
pages = []
for item in response.json().get("results", []):
page = OnlineDocumentPage(
page_name=item.get("title", ""),
page_id=item.get("id", ""),
type="page",
last_edited_time=item.get("version", {}).get("createdAt", ""),
parent_id=item.get("parentId", ""),
page_icon=None,
)
pages.append(page)
online_document_info = OnlineDocumentInfo(
workspace_name=workspace_name,
workspace_icon=workspace_icon,
workspace_id=workspace_id,
pages=[page],
total=pages.length(),
)
return DatasourceGetPagesResponse(result=[online_document_info])
```
```python theme={null}
def _get_content(self, page: GetOnlineDocumentPageContentRequest) -> Generator[DatasourceMessage, None, None]:
# your fetch content logic, example
response = requests.get(url, headers=headers, params=params, timeout=30)
...
yield self.create_variable_message("content", "")
yield self.create_variable_message("page_id", "")
yield self.create_variable_message("workspace_id", "")
```
#### Online Drive
An online drive data source plugin returns a file, so it must adhere to the following specification:
```yaml theme={null}
output_schema:
type: object
properties:
file:
$ref: "https://dify.ai/schemas/v1/file.json"
```
In the main logic code for an online drive plugin, the class must inherit from `OnlineDriveDatasource` and implement two methods: `_browse_files` and `_download_file`.
When a user runs the plugin, it first calls `_browse_files` to get a file list. At this point, `prefix` is empty, indicating a request for the root directory's file list. The list contains both folder and file entries. If the user opens a folder, `_browse_files` is called again, and the `prefix` in `OnlineDriveBrowseFilesRequest` is the folder ID used to retrieve the file list within that folder.
After a user selects a file, the plugin uses the `_download_file` method and the file ID to get the file's content. You can use the `_get_mime_type_from_filename` method to get the file's MIME type, allowing the pipeline to handle different file types appropriately.
When the file list contains multiple files, you can set `OnlineDriveFileBucket.is_truncated` to `True` and `OnlineDriveFileBucket.next_page_parameters` to the parameters needed to fetch the next page, such as the next page's request ID or URL, depending on the service provider.
```python theme={null}
def _browse_files(
self, request: OnlineDriveBrowseFilesRequest
) -> OnlineDriveBrowseFilesResponse:
credentials = self.runtime.credentials
bucket_name = request.bucket
prefix = request.prefix or "" # Allow empty prefix for root folder; When you browse the folder, the prefix is the folder id
max_keys = request.max_keys or 10
next_page_parameters = request.next_page_parameters or {}
files = []
files.append(OnlineDriveFile(
id="",
name="",
size=0,
type="folder" # or "file"
))
return OnlineDriveBrowseFilesResponse(result=[
OnlineDriveFileBucket(
bucket="",
files=files,
is_truncated=False,
next_page_parameters={}
)
])
```
```python theme={null}
def _download_file(self, request: OnlineDriveDownloadFileRequest) -> Generator[DatasourceMessage, None, None]:
credentials = self.runtime.credentials
file_id = request.id
file_content = bytes()
file_name = ""
mime_type = self._get_mime_type_from_filename(file_name)
yield self.create_blob_message(file_content, meta={
"file_name": file_name,
"mime_type": mime_type
})
def _get_mime_type_from_filename(self, filename: str) -> str:
"""Determine MIME type from file extension."""
import mimetypes
mime_type, _ = mimetypes.guess_type(filename)
return mime_type or "application/octet-stream"
```
For storage services like AWS S3, the `prefix`, `bucket`, and `id` variables have special uses and can be applied flexibly as needed during development:
* `prefix`: Represents the file path prefix. For example, `prefix=container1/folder1/` retrieves the files or file list from the `folder1` folder in the `container1` bucket.
* `bucket`: Represents the file bucket. For example, `bucket=container1` retrieves the files or file list in the `container1` bucket. This field can be left blank for non-standard S3 protocol drives.
* `id`: Since the `_download_file` method does not use the `prefix` variable, the full file path must be included in the `id`. For example, `id=container1/folder1/file1.txt` indicates retrieving the `file1.txt` file from the `folder1` folder in the `container1` bucket.
For reference implementations, see the [official Google Drive plugin](https://github.com/langgenius/dify-official-plugins/blob/main/datasources/google_cloud_storage/datasources/google_cloud_storage.py) and the [official AWS S3 plugin](https://github.com/langgenius/dify-official-plugins/blob/main/datasources/aws_s3_storage/datasources/aws_s3_storage.py).
## Debug the Plugin
Data source plugins support two debugging methods: remote debugging and installing the plugin locally. Note the following:
* If the plugin uses OAuth authentication, the `redirect_uri` for remote debugging differs from that of a local plugin. Update the relevant configuration in your service provider's OAuth App accordingly.
* While data source plugins support single-step debugging, we still recommend testing them in a complete knowledge pipeline to ensure full functionality.
## Final Checks
Before packaging and publishing, make sure you've completed all of the following:
* Set the minimum supported Dify version to `1.9.0`.
* Set the SDK version to `dify-plugin>=0.5.0,<0.6.0`.
* Write the `README.md` and `PRIVACY.md` files.
* Include only English content in the code files.
* Replace the default icon with the data source provider's logo.
## Package and Publish
In the plugin directory, run the following command to generate a `.difypkg` plugin package:
```bash theme={null}
dify plugin package . -o your_datasource.difypkg
```
Next, you can:
* Import and use the plugin in your Dify environment.
* Publish the plugin to Dify Marketplace by submitting a pull request.
For the plugin publishing process, see [Publishing Plugins](/en/develop-plugin/publishing/marketplace-listing/release-overview).